


利用MAXQ7667确定超声传感器的谐振频率和阻尼特性
出处:MLH203242 发布于:2010-11-27 11:00:39
引言
本文介绍了如何利用MAXQ7667智能SoC (片上系统)确定超声传感器的谐振频率和阻尼特性。这些功能有助于诊断传感器模块,优化系统性能,并且可以在生产过程中用于校准。本应用笔记并非针对所有系统泛泛地讨论“如何实现”,而是针对特定的传感器模型讨论设计细节以及特定条件下的性能。利用这些信息,用户可以大大简化系统测试。另外,这些测试假定超声波反射目标与传感器的距离大于1英尺。
测试装置
本文中的所有测试数据取自MAXQ7667 EV (评估)板,这些数据通过评估板的RS-232串口传送到PC,然后利用Excel表产生曲线图。传感器采用随评估板提供的40kHz 400EP250。传感器水平安装在电路板上,可以方便地在传感器上加装其它材料以改变传感器的性能。这里采用了三种传感器条件应用于各种测试:清洁干燥的传感器(正常工作条件)、在传感器表面注水、传感器表面附有油渍。
图1至图3显示了这些不同条件下传感器的参数,可以看到有较大的差异。传感器表面注水会降低传感器的谐振频率、减小阻尼;油渍的影响则相反,会提高谐振频率、并显着增大阻尼。
阻尼测试
阻尼测试用于测量传感器的谐振时间,测试非常简单,首先产生一个短脉冲激励传感器,然后监测传感器输出,观察信号的衰减速度。图1至图3给出了三种不同频率下回波接收通道的阻尼。从三组曲线可以很容易看出油渍会导致强阻尼。另外,如果观察阻尼的细微变化,这些曲线还显示了接收频率的重要作用。
由于该测试非常简单,可以在多个频率下进行测试。在多个频率下进行测试时,保持相对恒定的激励脉冲宽度。利用一个持续时间固定的激励窄脉冲,可以消除传感器能量变化或者在谐振频率处激励传感器造成的差异。
图1、图2和图3中,以25?s的间隔采集LPF (低通滤波器)输出,传感器激励脉冲宽度近似为6?s。注意,如果只使用一个频率并且PLL已处于所要求的频率,该测试可以在低于3ms的间隔下进行。在两次测量之间有充分的时间观测峰值,并检测信号衰减到给定峰值百分比的时间。如果使用多个频率,可能需要额外的测量时间,同时也需要更多时间使PLL稳定到一个新的频率。
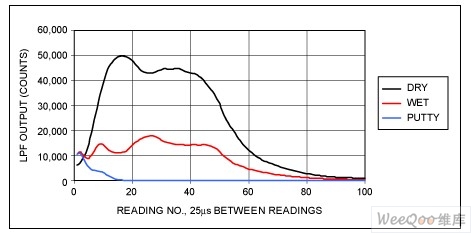
图1. 利用40kHz中心频率滤波器时的阻尼测量
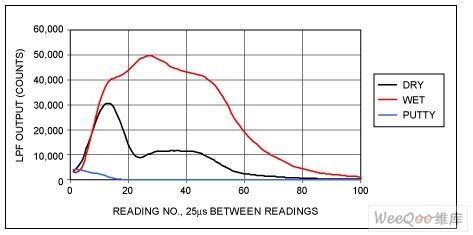
图2. 利用35kHz中心频率滤波器时的阻尼测量

图3. 利用45kHz中心频率滤波器时的阻尼测量
扫频
扫频可以确认传感器的谐振频率。图4清楚地显示了不同外加材料(三种不同测试条件)对传感器谐振频率的影响。从图4数据可以看出:接收器中心频率以400Hz的间隔从30kHz变化到50kHz,共计51个频率。对于51个频率的每个频率,从激励到读取LPF输出的时间间隔相同。诊断时需要特别注意:从激励到读取LPF数据的时间间隔必须正确。这个时间间隔必须足够长,使回波接收通道脱离饱和;但还要足够短,保证传感器仍然能够产生比较强的信号。似乎单一的固定时间间隔很难满足所有条件。例如,从图2可以明显看出,如果传感器有油渍,信号在正常的传感器脱离饱和之前就被完全衰减掉。考虑到这种状况,必须动态调整从激励到测量LPF输出的时间间隔。幸运的是阻尼测试(见下文)可以很容易地确定一个较好的时间间隔。
为了收集图4数据(即LPF输出数据),阻尼测试首先在三种不同频率下进行,保存从激励到信号衰减到峰值一半的时间。三次测试的长时间间隔将用作扫频测试的时间间隔。这个过程确定了能够保证任何传感器条件下都可以产生较好的输出信号的时间间隔。
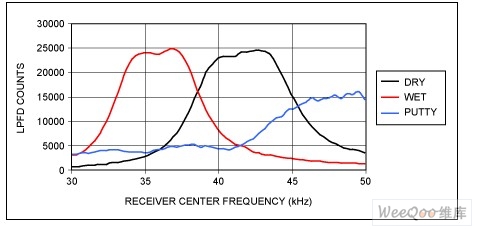
图4. 三种传感器测试条件下的扫频测试
总之,为了确定从激励到测量的时间间隔,扫频测试之前至少进行阻尼测试。扫频测试需要比阻尼测试更长的时间。频率步进变化多个频点,每个频率必须在激励传感器以及进行相应的测量之前建立。这种情况下,整个测试大约需要650ms。如果PLL频率建立时间较短,或者是减少测量频点、降低阻尼测试次数,可以缩短测试时间。而这些改变会导致传感器测量参数的降低,但能够满足绝大多数应用的要求。
图4数据显示了传感器相当宽的谐振频带,与传感器本身的性能相比,这个谐振带宽与MAXQ7667的带通滤波器带宽的关系更密切。即便如此,这个测试仍然对确定传感器的中心频率非常有用。
简化测试条件
本应用笔记提供的图表为设计人员提供了一个简便的参考,但很难进行自动诊断。为了简化测试过程,可以将数据减少到几个数值,然后将这些数值和表格中的参考值进行对比。这些参考值可以按温度排序。而温度很容易通过SAR ADC和热敏电阻得到。
以下程序代码(附录A)用于捕获图4中的数据,该程序还提供了三方面的数据,可用于定义传感器的条件。这些数据是:
阻尼测试中,谐振频率处的LPF峰值数据。
阻尼时间,或者是从激励到信号衰减至峰值一半的时间。
中心频率或谐振频率,该数值表示为PLL的建立时间,是下限PLL建立时间(信号为峰值的70%)和上限PLL建立时间(信号为峰值的70%)的平均值,其中70%是任意决定的。
表1分别显示了三种传感器条件下的数据。通过这些数据,诊断程序很容易区分传感器所处的条件。
表1. 各种传感器工作条件下的数据总结

可以用于IAR?编译器2.12A的完整软件,如果将评估板的RS-232串口连接到PC的COM1,运行PC程序Transducer_Calibrate_115k2.exe,将会显示随频率变化的谐振曲线和评估的谐振频率(图5)。
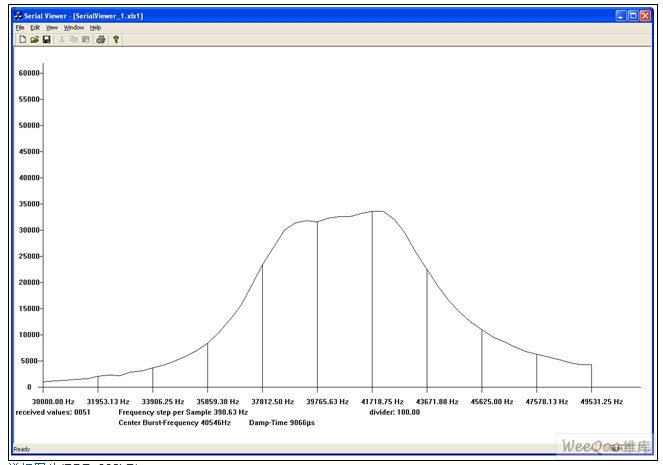
图5. 输出曲线图示例
附录A. 软件例程
MAXQ7667传感器校准文件
// This routine measures the transducer damping at the specified frequency (PLLfreq).
 // The system timer is used to measure when the LPF output (LPFD) has dropped to 1/2 the peak value.
 // This is the settling time that will be used later when doing the frequency sweep.

  unsigned damping_half_time (unsigned PLLfreq, unsigned pulse_width)
  {
          unsigned short i;
          unsigned short peak = 0;
          unsigned short half_peak = 0;
          unsigned short temp = 0;

    	  SCNT_bit.STIME = 0;           // Make sure system timer is off.
          STIM = 0;                     // Clear the system timer.
          SCNT_bit.STDIV = 4;           // Set system timer prescale pider to 16 (1µs per cycle).

          PLLF_bit.PLLF = PLLfreq;      // Set the PLL frequency.
          BPH = pulse_width;            // Pulse width = BPH/(receive frequency * 400) when BDIV = 0xC.
          usWaitTimer2(10000);          // Let the PLL settle for 10ms.
          SCNT_bit.STIME = 1;           // Start the system timer.

          BPH_bit .BSTT = 1;            // Send a burst.
          usWaitTimer2(50);             // Wait for LPF to partially settle.
          RunTimer0_us(20);             // Start timer # 1 with a reload time of every 20µs.

          for (i = 0; i < 200; i++)
          {
              temp = LPFD;                                        // Read the output of the lowpass filter.
              if (temp > 0x2000 && temp > peak) {peak = temp;}    // Save the peak value if it is greater than 2000.
              if (temp < peak/2 && half_peak == 0)    // If LPFD is less than half the peak value and the half peak time
              {                                                   	// has not been set, then
                half_peak = STIM;                                 // save the time it took to reach half the peak value.
                i = 101;                                          // Half peak found so exit the loop.
              }
              while (T2CNB0_bit.TF2 == 0) {}                      // Wait for timer # 0.
              T2CNB0_bit.TF2 = 0;                                 // Clear flag.
          }
          T2CNA0_bit.TR2 = 0;                                     // Stop timer # 0.

          return half_peak;
   }

void main()
{
	unsigned short i = 0;
	unsigned short peak = 0;
	unsigned short first70 = 0;
	unsigned short second70 = 0;
	unsigned short center_pllf;

	unsigned short wait2measure;
	unsigned short halfpeak;


    init();


    // ***********************************************************************************************************
    // ***********************************************************************************************************
    // Configuration settings

      echo_receive_gain(0);           // Set receiver to minimum gain (allowed values 0-31)

      Burst_Clock_Divider = 400;      // for calculating the burst-frequency in PC-Application.
      burst_setup(BURST_CLK_PLL, BURST_PULSE_1, BURST_DIV_400, 0, PLL_CLOCK_16MHZ, 0);

      step_size=10;                   // Sets the step-size (steps go from 0 to 511).

    // END configuration settings.
    // ***********************************************************************************************************
    // ***********************************************************************************************************

    while(1)
    {
          // Use the "damping_half_time" routine to measure the time in µs that it takes for the
          // ringing to drop to half of the peak value.  Do this at more than one frequency so that
          // one of the frequencies will be within range of the transducer.
          wait2measure = damping_half_time(128, 88);   //Measure damping time at 35kHz.
          halfpeak = damping_half_time(256, 101);     //Measure damping time at 40kHz.
          if (wait2measure < halfpeak) {wait2measure = halfpeak;} // Save the longest time.
          halfpeak = damping_half_time(384, 113);     //Measure damping time at 45kHz.
          if (wait2measure < halfpeak) {wait2measure = halfpeak;} // Save the longest time.

          // Repeatedly pulse the transducer with a constant width pulse while sweeping the receiver
          // frequency.  Use the half-time value from the damping test (wait2measure) for the interval
          // between pulse transmission and reading LPFD (lowpass filter data).
          PLLF_bit.PLLF = 0;         // Start the sweep at 30kHz.
          BPH = 77;                  // Pulse ~6.3µs.  This value is easy to maintain over frequency.
          peak = 0;
          number_of_steps = 0;
          do    // Sweep from 30kHz to 50kHz with step_size * 39.062500kHz.
          {
              usWaitTimer2(5000);              // Wait 5ms for the frequency to settle.
              STIM = 0;                        // Reset the system timer.  It controls the Pulse to LPF read time.
              BPH_bit .BSTT = 1;               // Send burst.
              while(STIM < wait2measure) {}    // Wait the specified amount of time for the ringing to dampen.
              lpfdata[number_of_steps]= LPFD;  // Store the LPF reading.

              if(lpfdata[number_of_steps]> peak) {peak = lpfdata[number_of_steps];}   //Save the peak value.

              number_of_steps++;
              PLLF_bit.PLLF = number_of_steps * step_size;          // Increase the frequency.
              BPH = 77 + number_of_steps;                           // Increase the duty cycle to maintain pulse width.

          } while (PLLF < 512-step_size);

          // Find the center frequency based on the average of the two frequencies that have a
          // LPFD reading that is 70% of the peak reading.
          for (i = 0; i < number_of_steps; i++)
          {
                if (lpfdata[i] > peak*0.7)
                {
                    first70 = i;
                    i = number_of_steps;
                }
          }

          for (i = number_of_steps; i >0; i--)
          {
                if (lpfdata[i] > peak*0.7)
                {
                    second70 = i;
                    i= 1;
                }
          }

          i = (first70 + second70)/2;   // i = the loop value at the center frequency.
          center_pllf = i*step_size;         // Set PLLF_bit.PLLF to this value for the resonant frequency.

          //Remeasure damping using the center frequency.
          damp_time = damping_half_time(center_pllf, 75);

         // At this point there are three valuable pieces of information about the transducer.
         // Peak = the peak value from the frequency sweep.
         // center_pllf = the PLLF setting at the resonant frequency.
         // damp_time = time for the resonance to decay to 1/2 the peak value.

          center_burst_frequency =   16000000/Burst_Clock_Divider*(center_pllf+768)/1024;

      SendData();

  } // While(1)
} // End Main
版权与免责声明
凡本网注明“出处:维库电子市场网”的所有作品,版权均属于维库电子市场网,转载请必须注明维库电子市场网,https://www.dzsc.com,违反者本网将追究相关法律责任。
本网转载并注明自其它出处的作品,目的在于传递更多信息,并不代表本网赞同其观点或证实其内容的真实性,不承担此类作品侵权行为的直接责任及连带责任。其他媒体、网站或个人从本网转载时,必须保留本网注明的作品出处,并自负版权等法律责任。
如涉及作品内容、版权等问题,请在作品发表之日起一周内与本网联系,否则视为放弃相关权利。
- DHT11传感器简介及数据传输过程2024/3/20 17:23:57
- 什么是DS18B20温度传感器,DS18B20温度传感器的优缺点2024/2/26 17:15:41
- 使用细铜线作为集成传感器和加热器进行温度控制2024/2/18 16:11:54
- 使用电感器改进现有设计2024/1/22 16:42:19
- 什么是SLAM?SLAM算法涉及的4要素2024/1/17 16:35:15